16. Examples
16.1 Build Your Own "Parent Detector" Security System
Project Overview: Have you ever wondered who sneaks into your room when you aren't around? In this project, you will build a smart security system—often called a "Parent Detector" to find out exactly who has been in your room.
You will achieve this by combining a Raspberry Pi, a motion sensor, and a camera to automatically trigger and record video footage of any intruders.
Step 1: Gather Your Hardware
To build this automated security camera, you will need three main hardware components:
· A Raspberry Pi: This acts as the brain of your project, processing the signals and running the code.
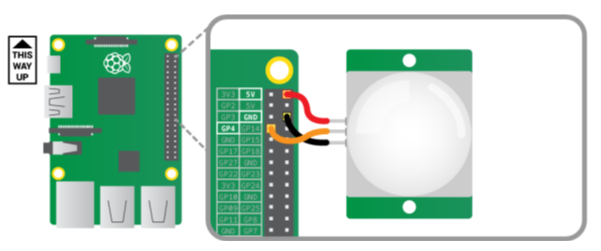
· A Passive Infrared (PIR) Motion Sensor: This component acts as the "eyes" of your system, detecting changes in infrared heat to sense when a person moves nearby.
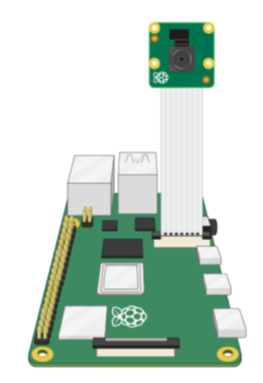
· A Raspberry Pi Camera Module: This is the device that will capture the video evidence of the intruder.
Step 2: Understand and Tune the PIR Sensor
Before plugging anything in with wires, you need to configure the physical settings on the PIR sensor itself. If you look at the back of the PIR module, you will see two orange components with small cross-shaped sockets that perfectly fit a Philips screwdriver.
These orange dials are called potentiometers, and they allow you to manually adjust how the sensor behaves:
· Sensitivity: Determines how much movement is required to trigger the sensor.
· Time (Delay): Determines how long the sensor remains "triggered" after detecting movement before it resets.
Initial Setup: For this project to work best, use your screwdriver to set the sensitivity potentiometer to its absolute maximum, and set the time potentiometer to its absolute minimum. You can always tweak and vary these settings later if you find the sensor is too sensitive or stays on for too long.
Step 3: Wire the Components Safely
Now it is time to connect your hardware to the Raspberry Pi. Crucial Rule: Always make sure your Raspberry Pi is completely turned off and unplugged before connecting hardware.
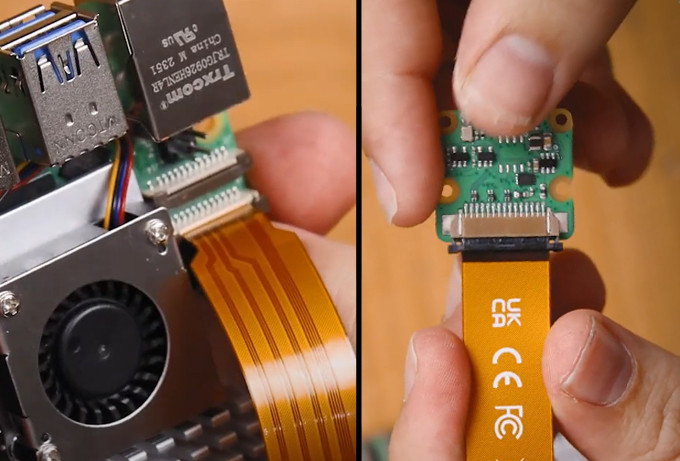
1. Connect the Camera: Carefully insert the ribbon cable of the Camera Module into the dedicated camera port on the Raspberry Pi.
2. Connect the PIR Sensor: The PIR sensor needs to send its movement data to the Raspberry Pi. You will connect the data output pin of the PIR sensor directly to the pin labeled GPIO 4 on your Raspberry Pi board. (You will also need to connect the power (VCC) and ground (GND) pins to the respective 5V and GND pins on the Pi).
Step 4: Write the Security Software (Python)
Once your hardware is wired, turn on your Raspberry Pi. Open the programming environment called Thonny, create a new file, and save it immediately as parent_detector.py.
To make our hardware work, we need to import specific libraries. We will use MotionSensor from the gpiozero library to handle the PIR sensor, and the Camera class from the picamzero library to control the Camera Module.
The Logic of the Code:
1. Continuous Monitoring: We use a while True: loop, which is an infinite loop that keeps the program checking for motion forever.
2. Waiting for Action: The program uses pir.wait_for_motion() to pause the code until the sensor detects movement. Once motion is detected, it prints a message to the screen.
3. Recording: The camera begins capturing video using the cam.start_recording() function.
4. Stopping: We don't want to record an empty room forever. The code uses pir.wait_for_no_motion() to wait until the intruder leaves, and then safely stops the video file using cam.stop_recording().
Solving a Critical Bug (The Overwrite Problem): If we simply tell the camera to save the file as intruder.mp4, every time a new person enters the room, the old video will be completely overwritten and deleted. To ensure we keep a video log of everyone (pesky parents or siblings), we need a dynamic filename. We can use Python's time library to automatically find out the current date and time and inject it into the video's filename.
Start with this code and your favourite AI tools to test this code:
Type this into your parent_detector.py file:
1. from gpiozero import MotionSensor
2. from picamzero import Camera
3. import time
4.
5. # 1. Initialize Hardware
6. # Set up the PIR sensor on GPIO 4
7. pir = MotionSensor(4)
8.
9. # Create a Camera object to control the module
10. cam = Camera()
11.
12. print("Security System Armed. Waiting for intruders...")
13.
14. # 2. Main Security Loop
15. while True:
16. # Program pauses here until movement is detected
17. pir.wait_for_motion()
18. print("WARNING: Motion detected!")
19.
20. # 3. Generate a Unique Filename
21. # This creates a string like "20231025-143000" (YearMonthDay-HourMinuteSecond)
22. timestamp = time.strftime("%Y%m%d-%H%M%S")
23. filename = f"intruder_{timestamp}.mp4"
24.
25. # Start recording video evidence to the new file
26. print(f"Recording video: {filename}")
27. cam.start_recording(filename)
28.
29. # 4. Wait for the room to be empty again
30. pir.wait_for_no_motion()
31. print("Motion stopped.")
32.
33. # Stop recording to finalize and save the video file safely
34. cam.stop_recording()
35. print("System returning to standby mode.")
Now that your code is fully written and your hardware is securely connected, it is time to test if your parent detector actually works in the real world! First, click the Run button inside your Thonny programming environment to start the script. Once the program is running and waiting, deliberately wave your hand directly in front of the PIR motion detector to simulate an intruder walking into the room. Immediately look at your computer screen; you should see the words "Motion detected!" printed out in the console area, confirming that the sensor has successfully triggered the camera to start recording.
After triggering the alarm, you need to test the shut-off mechanism. Step out of the sensor's view, hold completely still, or gently cover the white dome of the sensor with your hand. Wait a few seconds until the console tells you that the motion has stopped and the system is returning to standby mode. This indicates that the program has safely finalized and closed the video file. Finally, open your Raspberry Pi's file manager and navigate to the exact same folder where you saved your parent_detector.py script. You should now see a brand new .mp4 video file waiting for you, featuring the unique date and time stamp in its name just as we programmed. Double-click this newly created file to watch the recorded evidence, verify the video quality, and make sure your camera angle captures the doorway perfectly!
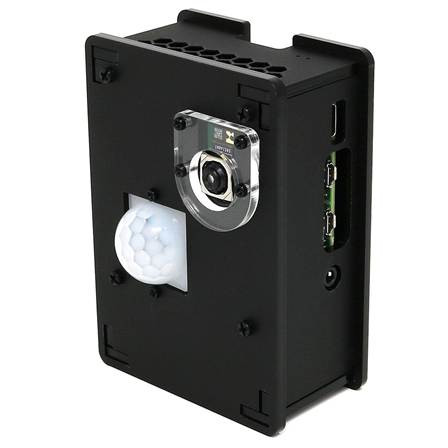
Additional pictures:
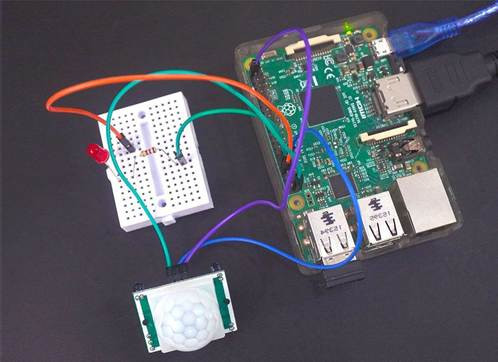
Source: https://www.electronicwings.com/raspberry-pi/pir-motion-sensor-interfacing-with-raspberry-pi
Source: https://thepihut.com/products/pir-camera-case-for-raspberry-pi-4-3
16.2 YOLO Pose Estimation Recognition
In this guide we will be setting up some with OpenCV and the YOLO pose estimation model family on the Raspberry Pi 5. We will be taking a look at a few of the different YOLO models available, as well as how to optimise them to get smoother FPS', and also how to use the keypoint data generated by the model so you can implement pose estimation into your next project. This has been one of the most fun guides we have made in a while so let's get into it!
To follow along with this guide you will need a:
· Raspberry Pi 5 - Either a 4GB or 8GB model will work here. Although this could technically be done on a Pi 4, it is far slower than the Pi 5 and would not be a nice experience, and for those reasons, we haven't tested on a Pi 4
· Pi Camera - We are using the Camera Module V3
· Adapter Cable - The Pi 5 comes with a different-sized CSI camera cable and your camera may come with the older thicker one so it's worth double-checking. The Camera Module V3 WILL need one
· Cooling Solution - We are using the active cooler (computer vision will really push your Pi to its limits)
· Power Supply
· Micro SD Card - At least 16GB in size
· Monitor and Micro-HDMI to HDMI Cable
· Mouse and Keyboard
Hardware Assembly
In terms of hardware assembly, it's pretty light here. Connect the thicker side of the cable to the camera, and the thinner side to the Pi 5. These connectors have a tab on them - lift them up, then insert the cable into the slot. Once it is sitting in there nice and square, push the tab back down to clamp the cable into place.
Just keep an eye out as these connectors only work in one orientation, and they can be fragile so avoid bending them tightly (a little bit is okay).
Installing Pi OS
First things first, we need to install Pi OS onto the micro SD card. Using the Raspberry Pi Imager, select Raspberry PI 5 as the Device, Raspberry Pi OS (64-bit) as the Operating system, and your microSD card as the storage device.
Same procedure as for PiRacer.
Setting up a Virtual Environment and Installing Libraries
With the introduction of Bookworm OS in 2023, we are now required to use Virtual Environments (or venv), as they are an isolated space on the Pi where we can experiment without the risk of harming the rest of our Pi OS or projects. We have all the needed commands and instructions in this guide.
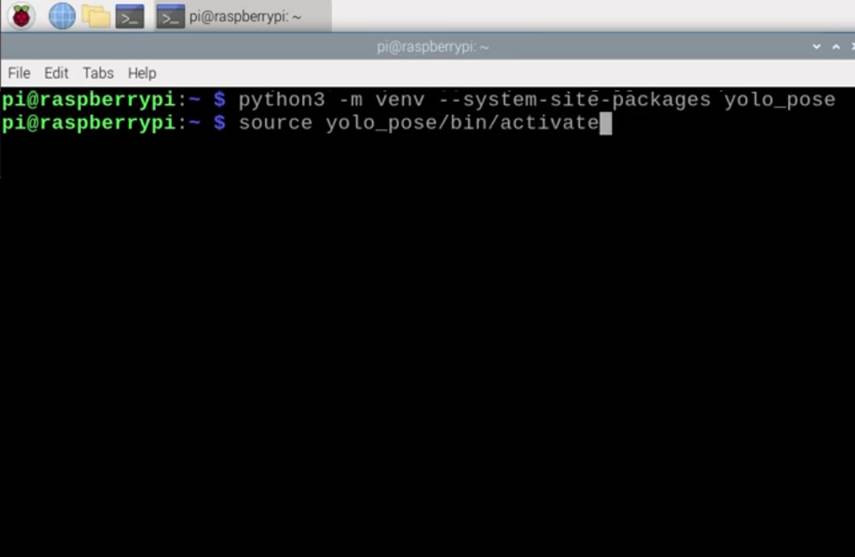
To create a virtual environment, open a new terminal window and type in:
python3 -m venv --system-site-packages yolo_pose
After creating the venv, we can enter into it by typing in:
source yolo_pose/bin/activate
After doing so you will see the name on the virtual environment to the left of the green text - this means we are correctly working within it. If you ever need to re-enter this environment (for example if you close the terminal window you will exit the environment), just type in the source command above again.
Now that we are working in a virtual environment, we can start installing the required packages. First, ensure that PIP (the Python package manager) is up to date by entering the three following lines:
sudo apt update
sudo apt install python3-pip -y
pip install -U pip
Then install the Ultralytics Package with:
pip install ultralytics[export]
The lovely folks at Ultralytics have been one of the key developers and maintainers of the newest YOLO models. This package of theirs is going to do much of the heavy lifting and will install OpenCV as well as all the required infrastructure for us to run YOLO.
This process will also install quite a large amount of other packages, and as a result, is prone to failing. If your installation fails (it will display a whole wall of red text), just type in the Ultralytics install line again and it should resume. In rare cases, the install line may need to be repeated a few times.
Once that has finished installing, reboot the Raspberry Pi. If you want to be a power user, you can do so by typing into the shell:
reboot
We have one more thing to do, and that is to set up Thonny to use the virtual environment we just created. Thonny is the program we will be running all of our code out of and we need to get it to work out of the same venv so that it has access to the libraries we installed.
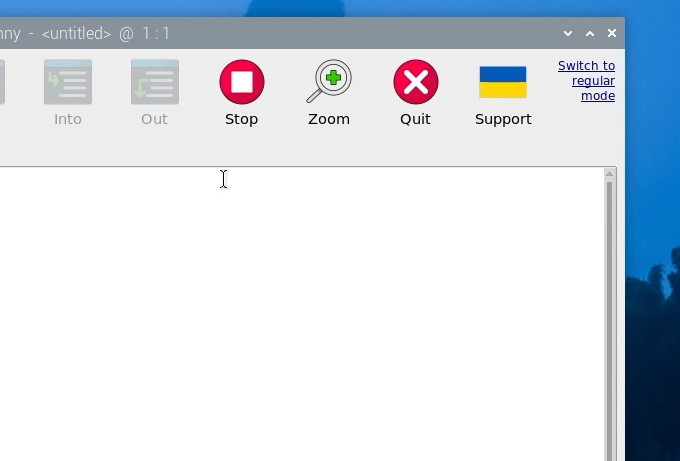
The first time you open Thonny it may be in the simplified mode, and you will see a "switch to regular mode" in the top right. If this is present click it and restart Thonny by closing it.
Now enter the interpreter options menu by selecting Run > Configure Interpreter. Under the Python executable option, there is a button with 3 dots. Select it and navigate to the Python executable in the virtual environment we just created.
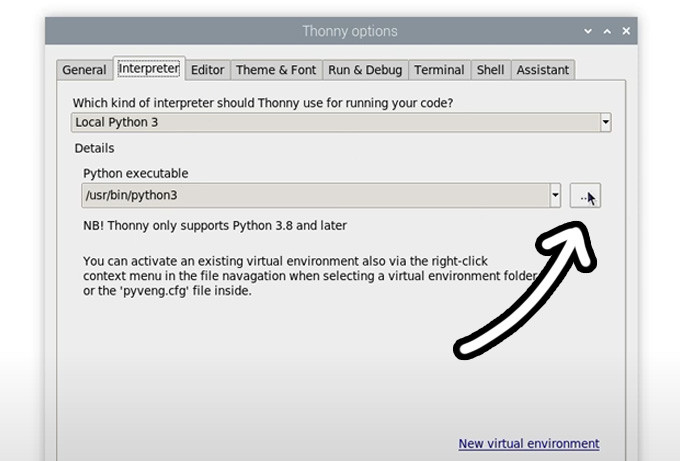
This will be located under home/pi/yolo_pose/bin and in this file, you will need to select the file called "python3". Hit okay and you will now be working in this venv.
Whenever you open Thonny, it will now automatically work out of this environment. You can change the environment you are working out of by selecting it from the drop-down menu under the Python executable in the same interpreter options menu. If you wish to exit the virtual environment, select the option bin/python3.
Running Pose Estimation
Now that we have our libraries installed and Thonny is working out of the virtual environment, we can run our pose estimation script. Go ahead and extract the project zip folder(download from our server) to a convenient place like the desktop. In there, you will find the first script we will use "pose demo.py". Open it Thonny and hit the big green run button. The first time you run this it may install a few extra needed things (all automatically), and after a few seconds you should see a preview window appear with your pose estimation running.
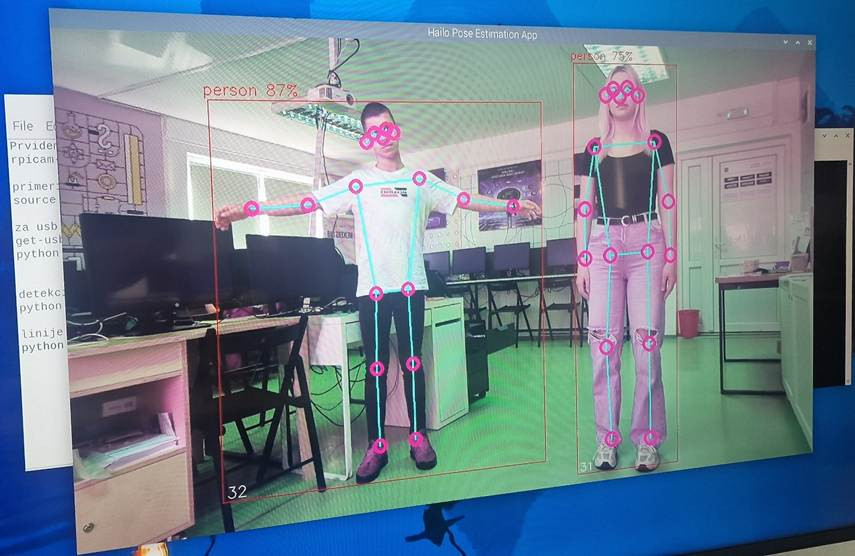
A few things should be happening here. First YOLO will be trying to detect humans, and if it recognises one it will draw a box around it with the confidence rating at the top. The important thing is that it will be placing points at where it thinks some essential places of your body are (these are called keypoints), and it will be drawing lines between these points to estimate the pose and orientation of the person. In the top right will also be the FPS this is running at (which we will improve in a bit).
And that's it! With these few steps, we already have our Pi running pose estimation!
Changing YOLO Models
So far we have been running YOLO11, and one of the beauties of this Ultralytics package is that we can simply swap out a single line in the code to completely change the model. We can use this to run a more advanced YOLO11 model, or even an older model. All you need to change is this line here in the setup:
# Load our YOLO11 model
model = YOLO("yolo11n-pose.pt")
This line is currently using the nano model which is the smallest, least powerful, but fastest model of YOLO11, and we can change this line to run one of the different sizes that this model comes in by changing the single letter after "11" as shown on the right. If you change this line to another model size and run it, the script will automatically download the new model (which can be in the 100s of Mb for the larger models).
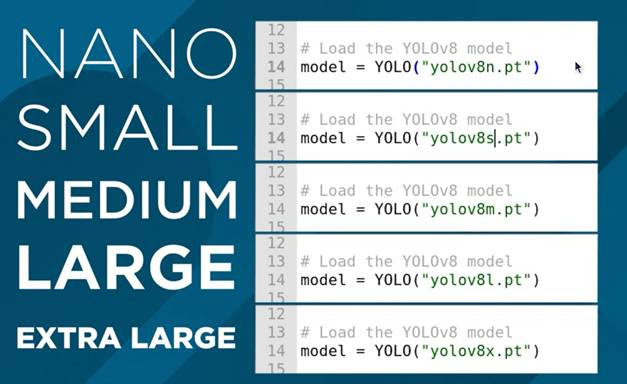
The difference between these models is a trade-off between pose-estimation performance and FPS. The larger the model, the better it is at estimating the parts of your body that might not be seen by the camera, as well as more complex angles, and frames with more people in it, however, you can expect to only get 1 frame processed every 10 seconds! We will increase this in the next step.
The nano model on the other hand runs the fastest, getting about 1.5 FPS without optimisation, but it doesn't have the processing power of the larger models. For pose estimation, you can get away with the nano model most of the time as it is usually good enough for your needs, but if you need something a bit more powerful, keep increasing the model size to fit your needs.
In this line, we can also change the version of YOLO running. You can revert to an older model if you want, or you can utilise a newer model. This guide will eventually be outdated and if Ultralytics releases YOLO13, you should simply be able to change the line to the following to start using the newer YOLO version:
# Load our YOLO11 model
model = YOLO("yolo13n-pose.pt")
Increasing Processing Speed
There are 2 things we can do to increase FPS on the Pi and the most effective way is to convert the model to a format called NCNN. This is a model format more optimised to run on ARM-based processors like the Raspberry Pi's. Open up the script called "ncnn conversion.py" and you will find the following:
from ultralytics import YOLO
# Load a YOLO11n PyTorch model
model = YOLO("yolo11n-pose.pt")
# Export the model to NCNN format
model.export(format="ncnn", imgsz=640) # creates 'yolov11n-pose_ncnn_model'
To use this script, first specify the model you wish to convert. This uses the same naming conventions we talked about in the last section. Then the model format "ncnn" is specified as the output format, as well as the resolution. For now keep this at the default of 640. The first time you run this script it will download some more additional things it needs, but it should only take a few seconds to run the actual conversion.
Once that has finished, in the folder the scripts live in your will find a new folder called something along the lines of "yolo11n-pose_ncnn_model". Copy the name of this file and return to our demo script from earlier.
You now need to tell the script to use this model that we created by changing the model line to the name of that folder it just created. It should look something like this:
# Load our YOLO11 model
model = YOLO("yolo11n-pose_ncnn_model")
Last modified: Saturday, 20 June 2026, 8:05 AM