13. Introduction
The Raspberry Pi is a little computer about the size of a deck of cards and capable of running a full Linux desktop operating system while consuming only modest power. It includes USB ports for connecting a keyboard and mouse along with a variety of other peripherals, an ethernet adapter, and HDMI monitor connections. The Raspberry Pi was originally constructed for education, but has found fruitful uses for hobbyists, home automation, industrial applications, and as an appropriate technol‑ ogy for use in schools in the majority world. It is manufactured to comply with RoHS (Restriction of Hazardous Substances) directives and relies on a single microSD card for its storage. It runs a variant of Linux called the Raspberry Pi OS, and supports a wide variety of open source software, including a plethora of educational programs. Moreover, it can be purchased at a modest price. This guide was written primarily with engineering and computer science students in mind, but it will be of interest to others who have a keen interest in learning more about programming and technical computing.
13.1 Initial Setup of the Raspberry Pi
Insert an SD card with the Raspberry Pi OS in the Raspberry Pi and apply power. When you first boot the regular Raspberry Pi OS it will be running a graphical desktop environment with a friendly menu‑ driven interface. Upon the first boot, a dialogue box will appear guiding you through an initial setup. Follow the prompts to configure the keyboard and username. Provide a username and a password as prompted. Configure your Wi‑Fi settings and select the option to “Update Software” (note that this may take a very long time when you first setup the Raspberry Pi).
13.2 Getting Started with the Command Line
There is also a command‑line based version of the operating system called Raspberry Pi OS Lite. This version of the OS consumes less power than the regular Raspberry Pi OS running a desktop en‑ vironment and can be used on older models of the Raspberry Pi with less RAM. When setting up the Raspberry Pi with the Lite OS, you will be prompted to configure the keyboard and provide a user‑ name and password. The Lite version of the OS is well suited for using the Raspberry Pi as a server, as an embedded system, or in an IoT (Internet of Things) application. However, for regular desktop use, the regular version of Raspberry Pi OS is best. When using the Desktop OS, the command line can still be accessed using the Terminal app. Alternately, it can also be accessed using a virtual console by pressing CTRL+ALT+F1 which will enter a full screen terminal. If a login prompt appears, you can login using the username and password you configured during setup. One can return to the desktop from a virtual console by pressing CTRL+ALT+F7. Additional virtual consoles can be independently accessed using CTRL+ALT along with the keys F2 through F6.
13.3 The Shell
Once you enter the command line, you will be running in a Linux shell. In simple terms, a shell is a command interpreter which provides a rich set of commands which can be used to execute programs and interface with the operating system. The Raspberry Pi OS uses the Bash (Bourne Again Shell) by default, a shell based on an older shell called the Bourne Shell. BASH is popular among users of Linux and features automatic command line completion using the tab key and can be used to create programs called shell scripts. There are a variety of different Linux shells that can be used. As indicated, the default Linux shell is the Bash shell, but other shells are also available. Each shell has its own features and options. For example, to switch the default shell from Bash to the Z shell (zsh), type the following
sudo apt install zsh -y
chsh -s /bin/zsh
After issuing these command, logout and then back in and you should now be running with zsh. Various configuration options can be set inside a file named .zshrc located within your home folder.
13.4 Shell commands
Some of the commands available in the shell are summarized below:
|
Command |
|
|
cd directory |
Changes the current working directory to directory |
|
pwd |
Displays the name of the current working directory |
|
mkdir directory |
Create a new directory called directory |
|
rmdir directory |
Removes the directory called directory |
|
ls |
Display a list of files in the current directory |
|
cp f1 f2 |
Copy a file from the source f1 to the destination f2 |
|
rm filename |
Remove a file filename |
|
mv f1 f2 |
Move a file from f1 to f2 |
|
ftp host |
Transfer files to and from host |
These commands only represent a portion of the user commands available in a Linux shell. An on‑line manual referred to as the man (manual) pages provides help on the many commands and programs that can be called from the shell. The syntax for invoking the man utility is as follows:
man command-name
The information regarding the specified command-name will then be displayed on the screen.
13.5 Configuring the Raspberry Pi OS
The Raspberry Pi OS comes with a utility called raspi-config that can be used to configure a wide variety of settings and services. To run this utility, type:
sudo raspi-config
This will launch the Raspberry Pi configuration utility within the terminal with a main menu like the one shown below:
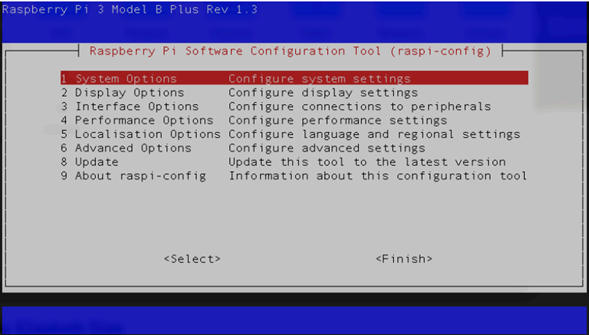
The Raspberry Pi configuration utility can be used to enable the camera interface as well as serial, I2C, and SPI communications. It also includes an option to boot directly to the command line rather than the desktop.
13.6 Connecting Remotely to the Raspberry Pi
It is possible to run the Raspberry Pi headless, without a screen, keyboard, or mouse. This is often the case when using the Raspberry Pi in an embedded application or an IoT (Internet of Things) configuration. The following subsections describe how to connect to your Raspberry Pi remotely using one of the following options:
• using a USB‑to‑TTL serial cable
• using SSH over an Ethernet or Wi‑Fi connection
• Raspberry Pi Connect service
Some models of the Raspberry Pi can be connected using a USB cable. This works by enabling USB Gadget Mode, which allows a USB port to present itself as a variety of different types of devices. This is known to work with the Raspberry Pi Zero and not with most other models. The two approaches described below should work with all models of the Raspberry Pi.
Last modified: Tuesday, 2 June 2026, 2:35 PM