7. WebXR: The Browser-Based Alternative
WebXR allows developers to create immersive experiences that run directly in the Meta Quest Browser. It is built on standard web technologies, making "VR on the web" as easy to access as a website.
Why Choose WebXR?
- Frictionless Access: Users don't need to download large files from the Meta Store; they simply click a URL and hit "Enter VR."
- Frameworks: It utilizes powerful JavaScript libraries like Three.js, A-Frame (HTML-based), or Babylon.js.
- Cross-Platform: A single WebXR app can often run on a Quest 3, an Android phone (AR mode), or a desktop PC.

7.1 Library Analysis
Three.js (The Render Engine)
Three.js handles the heavy lifting of WebGL. It manages the Scene, Camera, and Renderer. In your code, the renderer is set to alpha: true, which is vital for AR as it allows the "empty" parts of the browser to become a window into the real world.
TensorFlow.js & COCO-SSD
COCO-SSD (Common Objects in Context - Single Shot MultiBox Detector) is a model trained to recognize 80 classes of objects. The beauty of TF.js is its WebGL backend, which ensures that AI calculations are performed on the Quest’s GPU rather than the CPU, preventing the device from overheating.
7.2 Mathematical Projection (2D to 3D)
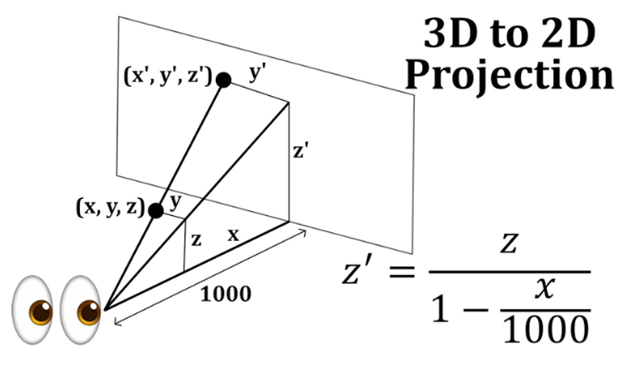
This is the most technical part of the script. The AI model returns a bbox (bounding box) in pixels (e.g., x=100, y=200).
The detectionTo3D function performs un-projection:
- Normalization: It converts screen coordinates to a range of $-1$ to $+1$.
- FOV Calculation: It factors in the camera's Field of View.
- Vector Ray: It creates a direction vector from the user's head position toward the object.
- Placement: It places the 3D label on that vector at a defined distance (DIST).
7.3 Implementing Hit-Testing
Hit-testing allows the app to "fire" an invisible ray (raycast) into real space to detect intersections with floors or tables. When the hitTestSource returns a result, the cursor (green ring) is snapped to that pose (position and orientation).
7.4 AI Pipeline: Detection and Labeling
In the code, detection is not performed every frame (which would lag the headset), but every $2000ms$ (DETECT_INTERVAL_MS).
- Label Sprite: Since Three.js cannot render standard HTML fonts directly in a 3D scene, we use a CanvasTexture. We "draw" the text on an invisible 2D HTML canvas and apply it as a texture to a 3D Sprite that always faces the user (billboarding).
7.5 The Necessity of HTTPS
WebXR and camera access (getUserMedia) are classified as "Powerful Features" by browser vendors. They will only work in a Secure Context.
- Localhost Exception: You can test on your PC using http://localhost, but as soon as you try to access that server from your Quest 3 headset, the browser will block XR features because it sees an insecure network IP (e.g., http://192.168.1.10).
- The Solution: You must use a Tunneling Service or Secure Hosting.
7.6 Meta Quest Link & Developer Mode
To run and debug your code efficiently, your Quest 3 must be recognized as a developer device.
Step-by-Step Activation:
- Developer Account: Register at dashboard.oculus.com. You will need to create an "Organization" (it can be any name).
- Mobile App: Open the Meta Quest app on your phone, go to Menu > Devices > Headset Settings > Developer Mode, and toggle it ON.
- The Link: Connect your Quest 3 to your PC using a high-quality USB-C 3.0 cable or via Air Link (High-speed Wi-Fi 6).
7.7 The Three.js Foundation (The Boilerplate)
Before entering AR, we must initialize a standard 3D environment. However, for Quest 3, two settings are non-negotiable:
- Alpha & Antialias:

- XR Activation:

This tells Three.js to listen for the Quest's head-tracking data ($6DOF$) and apply it to the `camera` object automatically.
7.8 Managing the AR Session (The Lifecycle)
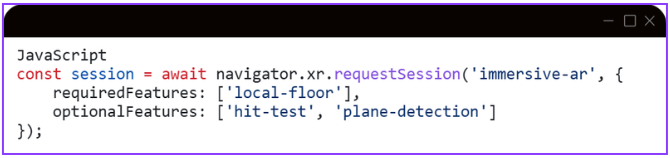
The "Enter AR" button triggers navigator.xr.requestSession. This is where we define what "superpowers" our app needs from the Quest 3 hardware.
Required & Optional Features:
- local-floor: This tells the Quest to set the $Y=0$ coordinate at the actual physical floor level.
- hit-test: Enables the ability to raycast against real-world geometry.
- plane-detection: Requests the "Semantic" data (knowing which mesh is a 'table' vs. a 'wall').
Last modified: Tuesday, 2 June 2026, 2:29 PM