1. PI-Racer Deep Learning Autopilot
1.1 PiRacer Assembly Manual
Screws/standoffs diagram
Diagram for reference. Note that the screws that come with servo wheel are not listed here. 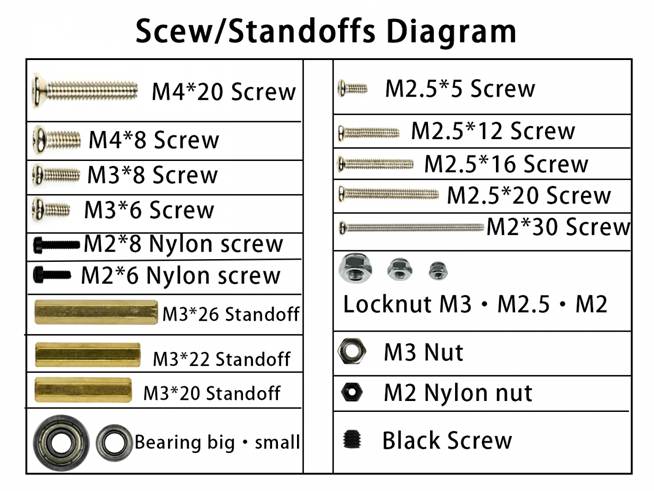
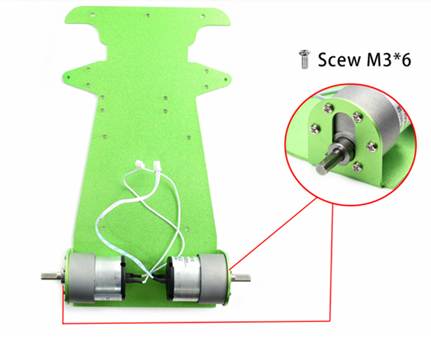
1. Attach the motors to metal chassis
Note: Do not use the M3*8. It is longer and might damage the motor.
2. Add couplers to wheels
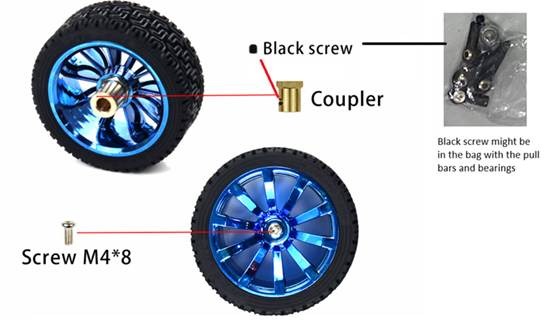
First, insert the black screw into the coupler. Then add the coupler to the wheel. You may need to press the coupler into the wheel. Secure the coupler to the wheel using M4*8 screw.
3. Assemble the wheels
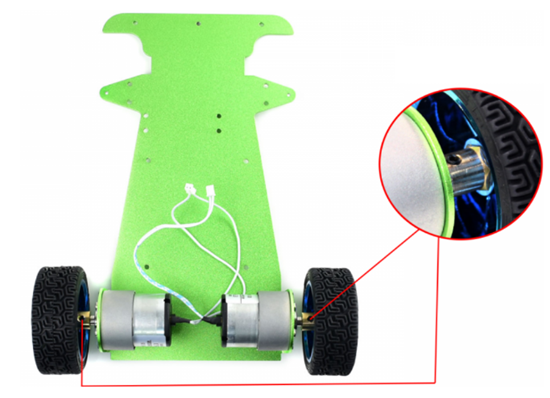
Tighten the black screw to secure the coupler to the flat side of the axel
4. Mount the servo holder on metal chassis
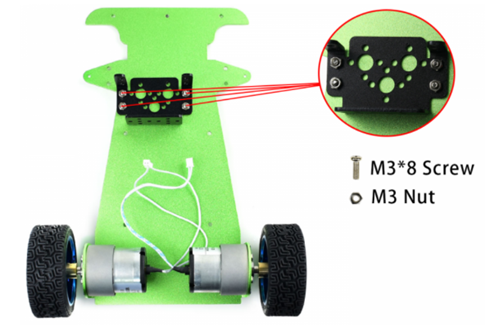
5. Attach the servo on the holder and using the screws and nuts
Make sure the servo is in correctly. The outer shaft should be in the center.
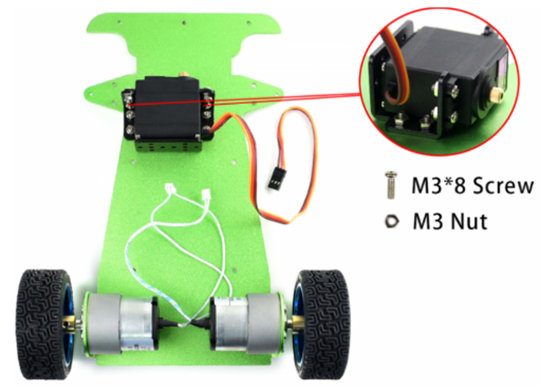
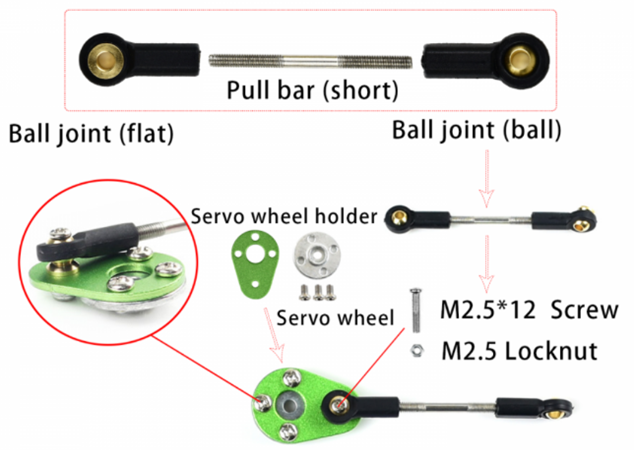
6. Assemble the servo pull bar
The pull bar is combined by using two ball joints, one flat and one ball, and the short bar. The two ball joints should be perpendicular to each other. Attach the servo wheel (horn) to the servo wheel holder using the screws that came with the servo wheel. Then attach flat ball joint to the servo wheel holder. Note that the groove of the servo wheel is toward outside.
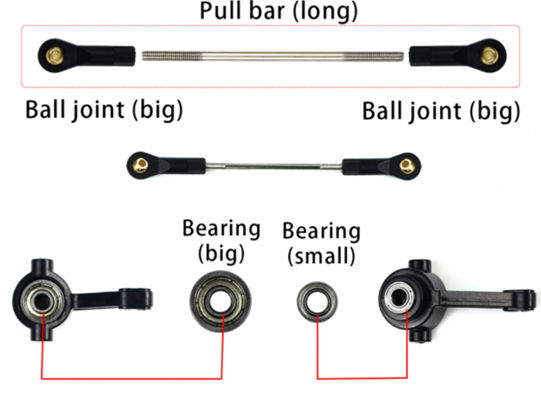
7. Assemble the front-wheel pull bar and the steering knuckles
The front-wheel pull bar is combined by using two ball joints and the long bar. Then put the bearings in the steering knuckles. Each knuckle needs a small and a large bearing.
8. Assemble the servo pull bard, front-wheel pull bard, and the steering knuckles
Attach the servo pull bar on the top, and then the front-wheel pull bar, and finally the knuckles. The larger bearing should towards the inside.
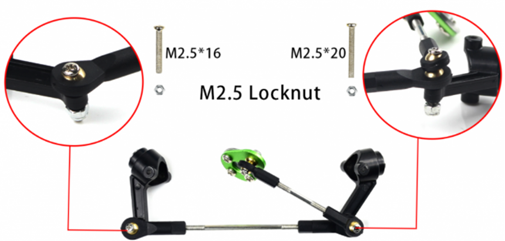
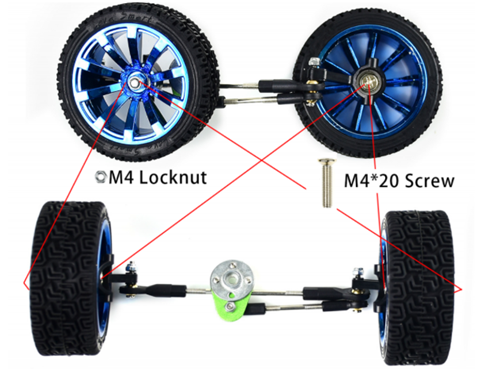
9. Attach the wheels on the steering knuckle
The nut should be on the outer side of the wheel, opposite the knuckle. Make sure the wheel is not too tight or too loose. Test the wheel to make sure it can move freely.
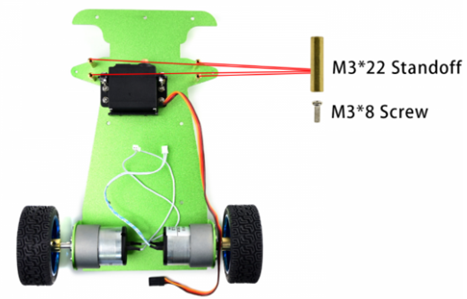
10. Add the M3 standoffs for the front wheels
11. Assemble the front-wheels combination
Put the servo wheel to servo, fix it by M3 screw. Fix the wheels by M2 screws and locknut and the triangle board. The front wheels should be straight forward. Adjust the long pull bar if needed.
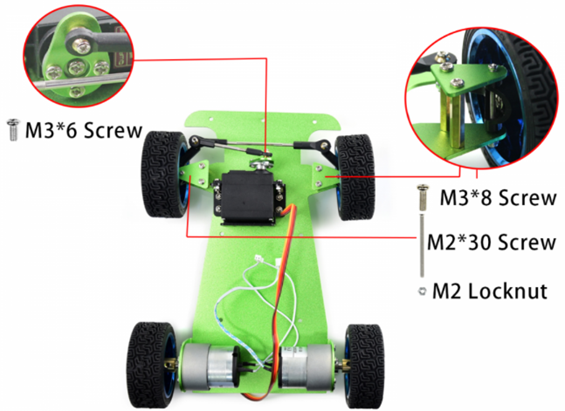
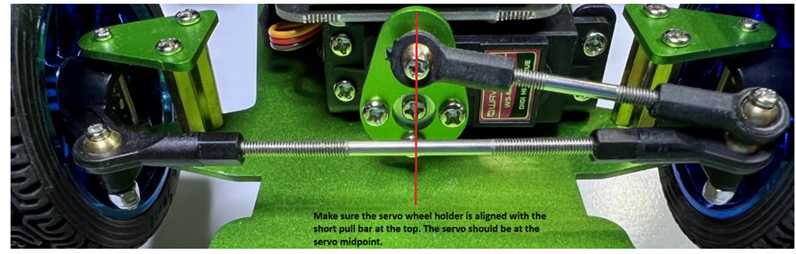
The front wheels should be straight forward. Adjust the long pull bar if needed.
12. Add the standoffs for PiRacer Expansion board and the bumper
Insert the EVA felt pads for the bumper and the PiRacer Expansion board.
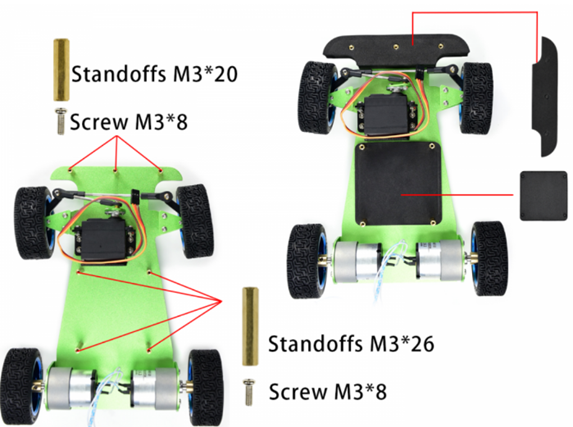
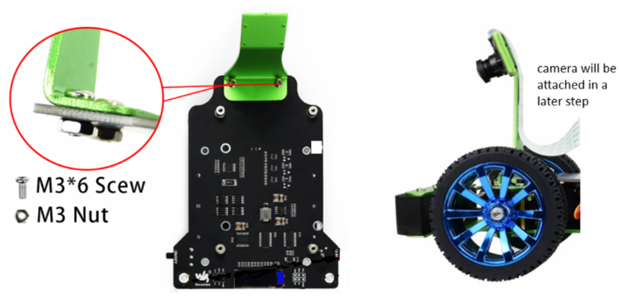
13. Attach the camera holder to PiRacer Expansion board.
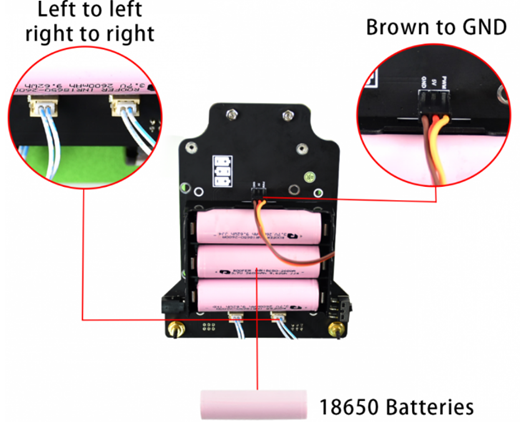
14. Insert the batteries in the correct direction
Connect the wires of the motors and servo to PiRacer Expansion board.
15. Attach the Expansion board and the metal bumper
Adjust the placement of motor and servo wires and attach the PiRacer Expansion board to the metal chassis and attach the metal bumper.
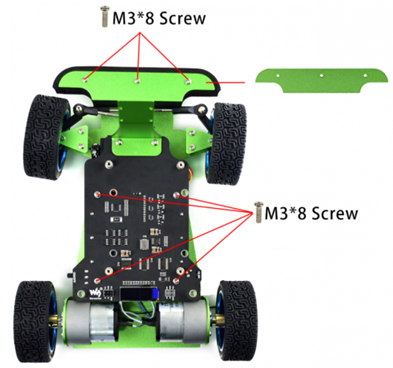
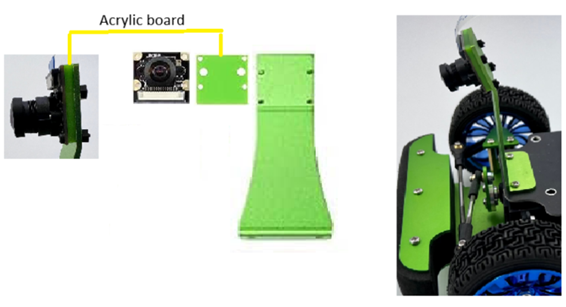
16. Mount camera to its holder using the nylon screws
Note: The Acrylic board should be between camera and the metal holder to avoid shorting.
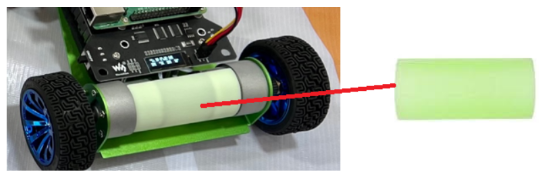
17. Attach the 3D-printed motor enclosure on DC motors
18. Power off the Raspberry Pi and disconnect the charger from the PiRacer Expansion board before proceeding.
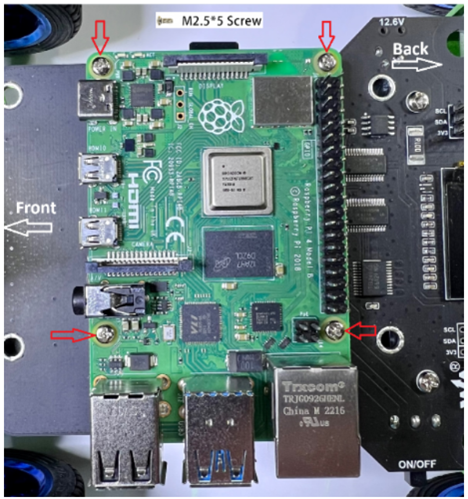
19. Attach the Raspberry Pi to the PiRacer Expansion board
GPIO pins should be at the back of the car.
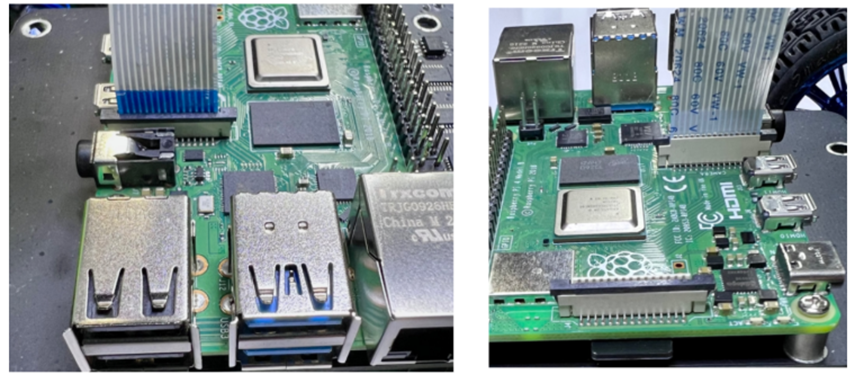
21. Attach the camera ribbon cable to the Raspberry Pi camera input
Blue side towards the Pi's USB ports.
**WARNING ** Make sure the Raspberry Pi is not powered when connecting the 6 pin wires
Also do not power the Raspberry Pi through the USB-C (external power) while it is powered by the PiRacer Expansion board.
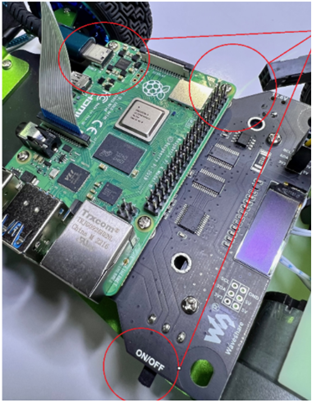
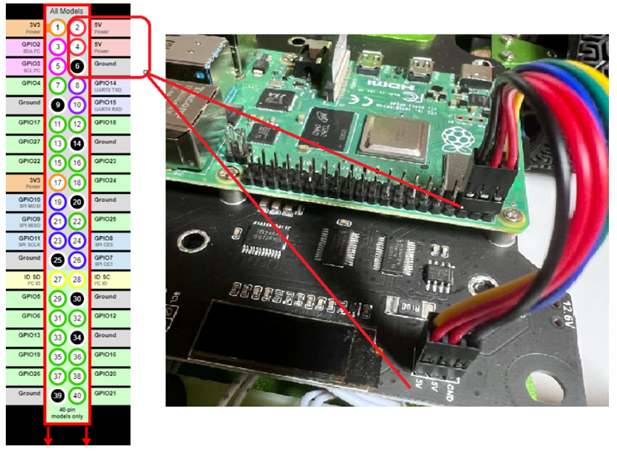
22. Connect the Raspberry Pi to the PiRacer Expansion board using the 6PIN wires
Match the red|red|black (5V|5V|ground) on the Pi GPIO and the black|red|red (gnd|5V|5V) on the PiRacer Expansion board.
1.2 Raspian Legacy (Buster) Desktop
Flash OS - Raspian Legacy (Buster) Desktop
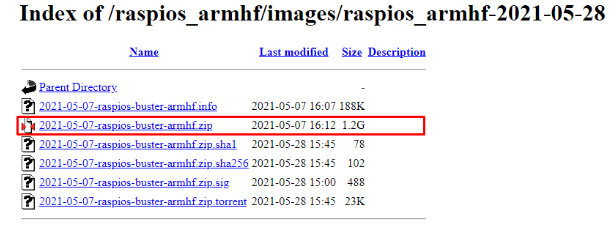
Navigate to the official download repository for Buster OS. All earlier versions of Raspberry Pi OS can be found and downloaded here and the directly previous Raspberry Pi 'Buster' OS official download link is here. See below for what that looks like, download the image file by clicking on the highlighted file.
Download and Install Raspberry Pi Imager from https://www.raspberrypi.com/software/
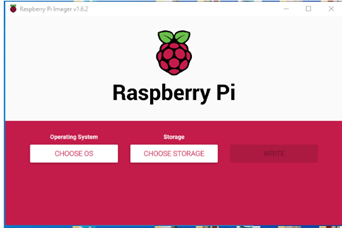
Now, let's open up the Official Raspberry Pi Imager, see it in the image below. Worth noting here - if you hit | CTRL+SHIFT+X | on your keyboard while in the Raspberry Pi Imager Program it will open the Advanced Hidden Menu. This Hidden Menu allows you to preconfigure your Raspberry Pi with SSH, WIFI credentials, and Localisation settings.
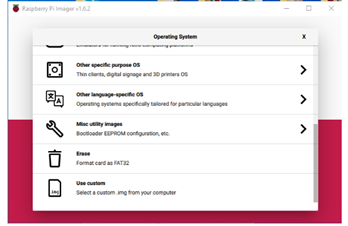
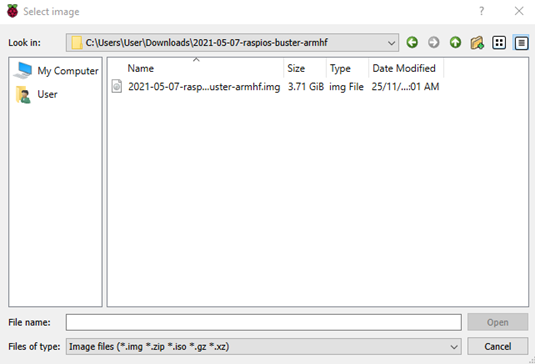
Having done this it will open up a file explorer. Navigate to that extracted Disc Image File and click on it. See this in the image below. Then open the file image and this will arm the Raspberry Pi Imager with the Raspberry Pi 'Buster' OS. Find it, select it, and open it.
Insert the Micro-SD card that you want to be flashed into your computer. Use a USB to Micro-SD adapter if needed. Then click on the | CHOOSE STORAGE | button and select your inserted Micro-SD. Keep in mind any data that was on your Micro-SD card will be wiped/permanently deleted when it is flashed. The Official Raspberry Pi Imager will now look like the image below.
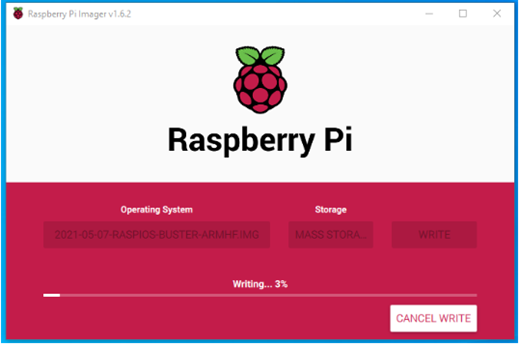
With everything sorted (the right OS loaded and the correct Storage selected) you can now click the | WRITE | button to start the flashing process. See this flashing process in the image below.
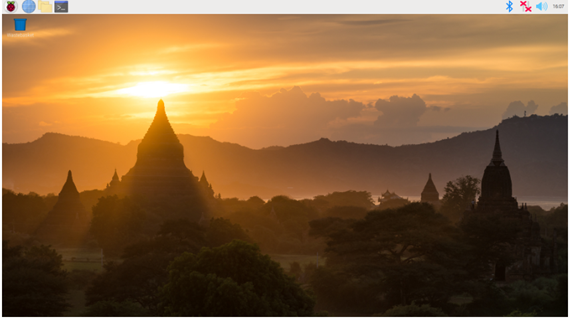
Once the flash is complete it will automatically virtually eject the Micro-SD card from the computer. So then you can simply physically take out your Micro-SD and insert it into a Raspberry Pi single-board computer. Then set your Raspberry Pi up normally as a desktop computer. Once it boots you will be greeted by the old familiar background, see image below, and you will have successfully flashed 'Buster' OS to your Raspberry Pi. You are free now to roam your well-acquainted digital ground.
Follow Pi Wizard instruction to set location, keyboard, wifi, and get update
Menu / Preferences / Raspberry Pi Configuration/ Interfaces
· enable Camera and I2C
· optional: enable VNC for remote access
· Click OK and reboot
Additional Software
Java 3.8.3 (run one at a time)
sudo apt install build-essential libncurses5-dev libgdbm-dev libnss3-dev libssl-dev libreadline-dev libffi-dev -y
wget https://www.python.org/ftp/python/3.8.3/Python-3.8.3.tgz
tar -zxvf Python-3.8.3.tgz
cd Python-3.8.3
sudo ./configure --enable-optimizations
sudo make -j 4
sudo make altinstall
sudo python3.8 -m pip install boto3
sudo python3.8 -m pip install tqdm
Additional tools
sudo apt install chromium-browser -y
sudo apt-get install zip unzip -y
AWS CLI
Default user accou nt on the Raspberry Pi
sudo apt install awscli -y
sudo pip3 install --upgrade awscli
sudo pip3 install boto3
user - pi
pw - raspberry
1.3 WaveShare Branch for DonkeyCar Software
Install Dependencies
sudo apt-get install build-essential python3 python3-dev python3-pip
python3-virtualenv python3-numpy python3-picamera python3-pandas
python3-rpi.gpio i2c-tools avahi-utils joystick libopenjp2-7-dev
libtiff5-dev gfortran libatlas-base-dev libopenblas-dev
libhdf5-serial-dev git ntp -y
Optional?
sudo apt-get install libilmbase-dev libopenexr-dev libgstreamer1.0-dev
libjasper-dev libwebp-dev libatlas-base-dev libavcodec-dev libavformat-dev
libswscale-dev libqtgui4 libqt4-test -y
Setup Virtual Environment
python3 -m virtualenv -p python3 env --system-site-packages
echo "source ~/env/bin/activate" >> ~/.bashrc
source ~/.bashrc
Install DonkeyCar Python Code - WaveShare Branch for DonkeyCar Software 3.1.0
mkdir projects
cd projects
git clone https://github.com/waveshare/donkeycar
cd donkeycar
git checkout master
pip install -e .[pi]
pip install tensorflow==1.13.1
Not needed pip install numpy --upgrade
pip install protobuf==3.20.*
Test tensorflow version - should show 1.13.1
python -c "import tensorflow; print(tensorflow.__version__)"
NOTE: Could not run model on car until running the following two
pip install https://github.com/lhelontra/tensorflow-on-arm/releases/download/v2.2.0/
tensorflow-2.2.0-cp37-none-linux_armv7l.whl
pip install tensorflow==1.13.1
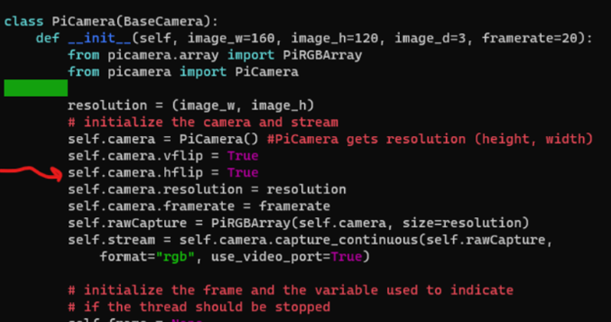
Edit camera.py to add self.camera.hflip = True
sudo nano /home/pi/projects/donkeycar/donkeycar/parts/camera.py
Optional Install OpenCV
sudo apt install python3-opencv -y
Test with:
python -c "import cv2"
1.4 Getting Started with DonkeyCar
Open a terminal window enter the following command
Create DonkeyCar App
This will create a folder called mycar with all the python code needed to drive the car.
Calibrate the front steering
Make sure your car is off the ground to prevent a runaway situation.
Use a small box like the on the Raspberry Pi came in.
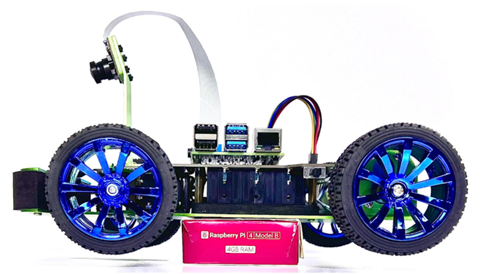
To make sure that the DonkeyCar can drive straight and make the needed turns on the track, the car's hardware and software need to be calibrated.
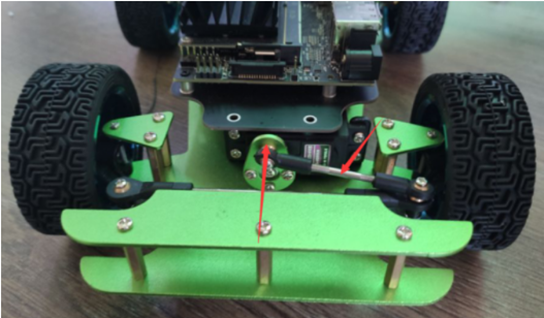
The front wheels should be straight forward. Adjust the long pull bar if needed
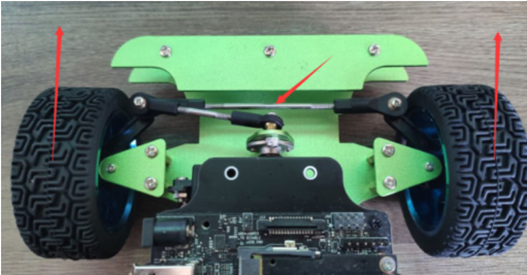
The servo wheel holder should be aligned with the short pull bar at the top. Adjust the short pull bar if needed.
Calibrate the servo software
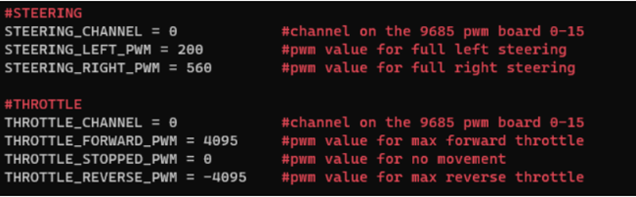
Find the the left, center and right steering PWM for this car's servo.
The center should be half way between the left and right. example:
Left 200
right 560
center will be 380
In a terminal window enter the following
cd ~/mycar
donkey calibrate --channel 0 --bus=1
Try values 300, 400, 500 and see how the steering changes. Figure out the max turn for left and right.
Once you have the numbers, edit the config.py and update the values you found.
The throttle should be set using your numbers for the steering. The throttle is already set correctly.
nano config.py
Install OLED Display Service
cd ~
git clone https://github.com/waveshare/pi-display
cd pi-display
sudo ./install.sh
cd ~
Last modified: Tuesday, 2 June 2026, 2:25 PM