
MNIST Dataset
The MINST dataset stands for "Modified National Institute of Standards and Technology". The dataset contains a large collection of handwritten digits that is commonly used for training various image processing systems. The dataset was created by re-mixing samples from NIST's original datasets, which were taken from American Census Bureau employees and high school students. It is designed to help scientists develop and test machine learning algorithms in pattern recognition and machine learning. It contains 60,000 training images and 10,000 testing images, each of which is a grayscale image of size 28x28 pixels.
Loading MNIST dataset using TensorFlow/Keras
This code snippet load mnist dataset keras example using Keras, retrieves the training images and labels, and then plots four images in a row with their corresponding labels. Each image is displayed in grayscale.from tensorflow.keras.datasets import mnist
import matplotlib.pyplot as plt
import numpy as npfrom tensorflow.keras.datasets import mnist
import matplotlib.pyplot as plt
import numpy as np
# Load the MNIST dataset
(X_train, y_train), (_, _) = mnist.load_data()
# Print 4 images in a row
plt.figure(figsize=(10, 5))
for i in range(4):
plt.subplot(1, 4, i+1)
plt.imshow(X_train[i], cmap='gray')
plt.title(f"Label: {y_train[i]}")
plt.axis('off')
plt.tight_layout()
plt.show()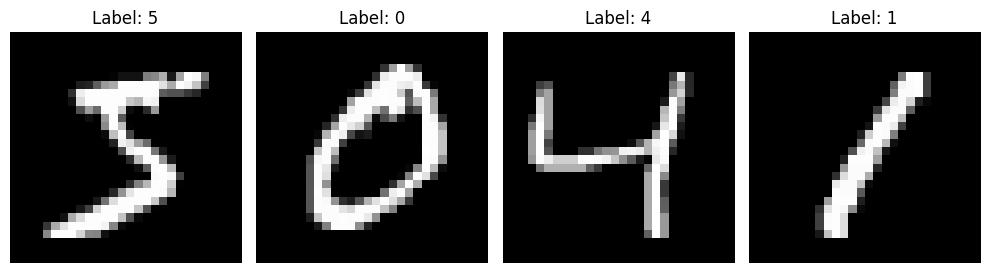
Loading MNIST dataset Using PyTorch
In this examples we will explore to load mnist dataset pytorch example. PyTorch offers a similar utility through torchvision.datasets, which is very convenient, especially when combined with torchvision.transforms to perform basic preprocessing like converting images to tensor format.
import matplotlib.pyplot as plt
import torch
from torchvision import datasets, transforms
# Define the transformation to convert images to PyTorch tensors
transform = transforms.Compose([transforms.ToTensor()])
# Load the MNIST dataset with the specified transformation
mnist_pytorch = datasets.MNIST(root='./data', train=True, download=True, transform=transform)
# Create a DataLoader to load the dataset in batches
train_loader_pytorch = torch.utils.data.DataLoader(mnist_pytorch, batch_size=1, shuffle=False)
# Create a figure to display the images
plt.figure(figsize=(15, 3))
# Print the first few images in a row
for i, (image, label) in enumerate(train_loader_pytorch):
    if i < 5:  # Print the first 5 samples
        plt.subplot(1, 5, i + 1)
        plt.imshow(image[0].squeeze(), cmap='gray')
        plt.title(f"Label: {label.item()}")
        plt.axis('off')
    else:
        break  # Exit the loop after printing 5 samples
plt.tight_layout()
plt.show()
Handwritten Digit Recognition using Python
We are going to implement a handwritten digit recognition app using the MNIST dataset. We will be using a special type of deep neural network called Convolutional Neural Networks. In the end, we are going to build a GUI in which you can draw the digit and recognize it straight away.
%pip install numpy, tensorflow, keras, pillow,
Import the libraries and load the dataset
The Keras library already contains some datasets and MNIST is one of them. So we can easily import the dataset and start working with it. The `mnist.load_data()` method returns us the training data, its labels, and also the testing data and its labels.
import keras
from keras.datasets import mnist
from keras.models import Sequential
from keras.layers import Dense, Dropout, Flatten
from keras.layers import Conv2D, MaxPooling2D
from keras import backend as K

# the data, split between train and test sets
(x_train, y_train), (x_test, y_test) = mnist.load_data()

print(x_train.shape, y_train.shape)
Preprocess the data
The image data cannot be fed directly into the model so we need to perform some operations and process the data to make it ready for our neural network. The dimension of the training data is (60000, 28, 28). The CNN model will require one more dimension so we reshape the matrix to shape (60000, 28, 28, 1).
x_train = x_train.reshape(x_train.shape[0], 28, 28, 1)
x_test = x_test.reshape(x_test.shape[0], 28, 28, 1)
input_shape = (28, 28, 1)

# Define the number of classes
num_classes = 10

# convert class vectors to binary class matrices
y_train = keras.utils.to_categorical(y_train, num_classes)
y_test = keras.utils.to_categorical(y_test, num_classes)

x_train = x_train.astype('float32')
x_test = x_test.astype('float32')
x_train /= 255
x_test /= 255
print('x_train shape:', x_train.shape)
print(x_train.shape[0], 'train samples')
print(x_test.shape[0], 'test samples')
Create the model
A CNN model generally consists of convolutional and pooling layers. It works better for data that are represented as grid structures, which is why CNNs work well for image classification problems. The dropout layer is used to deactivate some of the neurons during training, reducing overfitting of the model. We will then compile the model with the Adadelta optimizer.
batch_size = 128
num_classes = 10
epochs = 10

model = Sequential()
model.add(Conv2D(32, kernel_size=(3, 3),activation='relu',input_shape=input_shape))
model.add(Conv2D(64, (3, 3), activation='relu'))
model.add(MaxPooling2D(pool_size=(2, 2)))
model.add(Dropout(0.25))
model.add(Flatten())
model.add(Dense(256, activation='relu'))
model.add(Dropout(0.5))
model.add(Dense(num_classes, activation='softmax'))

model.compile(loss=keras.losses.categorical_crossentropy,optimizer=keras.optimizers.Adadelta(),metrics=['accuracy'])
Train the model
The `model.fit()` function of Keras will start the training of the model. It takes the training data, validation data, epochs, and batch size.
It takes some time to train the model. After training, we save the weights and model definition in the `mnist.h5` file.
hist = model.fit(x_train, y_train,batch_size=batch_size,epochs=epochs,verbose=1,validation_data=(x_test, y_test))
print("The model has successfully trained")

model.save('mnist.h5')
print("Saving the model as mnist.h5")
Evaluate the model
We have 10,000 images in our dataset which will be used to evaluate how well our model works. The testing data was not involved in the training process, so it is new data for our model. The MNIST dataset is well-balanced, so we can expect to achieve around 99% accuracy.
score = model.evaluate(x_test, y_test, verbose=0)
print('Test loss:', score[0])
print('Test accuracy:', score[1])
Create GUI to predict digits
Now for the GUI, we have created a new file where we build an interactive window to draw digits on a canvas. With a button, we can recognize the digit. The Tkinter library is part of the Python standard library. We have created a function `predict_digit()` that takes the image as input and then uses the trained model to predict the digit.
Then we create the `App` class, which is responsible for building the GUI for our app. We create a canvas where we can draw by capturing the mouse events. With a button, we trigger the `predict_digit()` function and display the results.
from keras.models import load_model
from tkinter import *
import tkinter as tk
import win32gui
from PIL import ImageGrab, Image
import numpy as np

model = load_model('mnist.h5')

def predict_digit(img):
    #resize image to 28x28 pixels
    img = img.resize((28,28))
    #convert rgb to grayscale
    img = img.convert('L')
    img = np.array(img)
    #reshaping to support our model input and normalizing
    img = img.reshape(1,28,28,1)
    img = img/255.0
    #predicting the class
    res = model.predict([img])[0]
    return np.argmax(res), max(res)

class App(tk.Tk):
    def __init__(self):
        tk.Tk.__init__(self)

        self.x = self.y = 0

        # Creating elements
        self.canvas = tk.Canvas(self, width=300, height=300, bg = "white", cursor="cross")
        self.label = tk.Label(self, text="Thinking..", font=("Helvetica", 48))
        self.classify_btn = tk.Button(self, text = "Recognise", command =         self.classify_handwriting)
        self.button_clear = tk.Button(self, text = "Clear", command = self.clear_all)

        # Grid structure
        self.canvas.grid(row=0, column=0, pady=2, sticky=W, )
        self.label.grid(row=0, column=1,pady=2, padx=2)
        self.classify_btn.grid(row=1, column=1, pady=2, padx=2)
        self.button_clear.grid(row=1, column=0, pady=2)

        #self.canvas.bind("<Motion>", self.start_pos)
        self.canvas.bind("<B1-Motion>", self.draw_lines)

    def clear_all(self):
        self.canvas.delete("all")

    def classify_handwriting(self):
        HWND = self.canvas.winfo_id() # get the handle of the canvas
        rect = win32gui.GetWindowRect(HWND) # get the coordinate of the canvas
        im = ImageGrab.grab(rect)

        digit, acc = predict_digit(im)
        self.label.configure(text= str(digit)+', '+ str(int(acc*100))+'%')

    def draw_lines(self, event):
        self.x = event.x
        self.y = event.y
        r=8
        self.canvas.create_oval(self.x-r, self.y-r, self.x + r, self.y + r, fill='black')

app = App()
mainloop()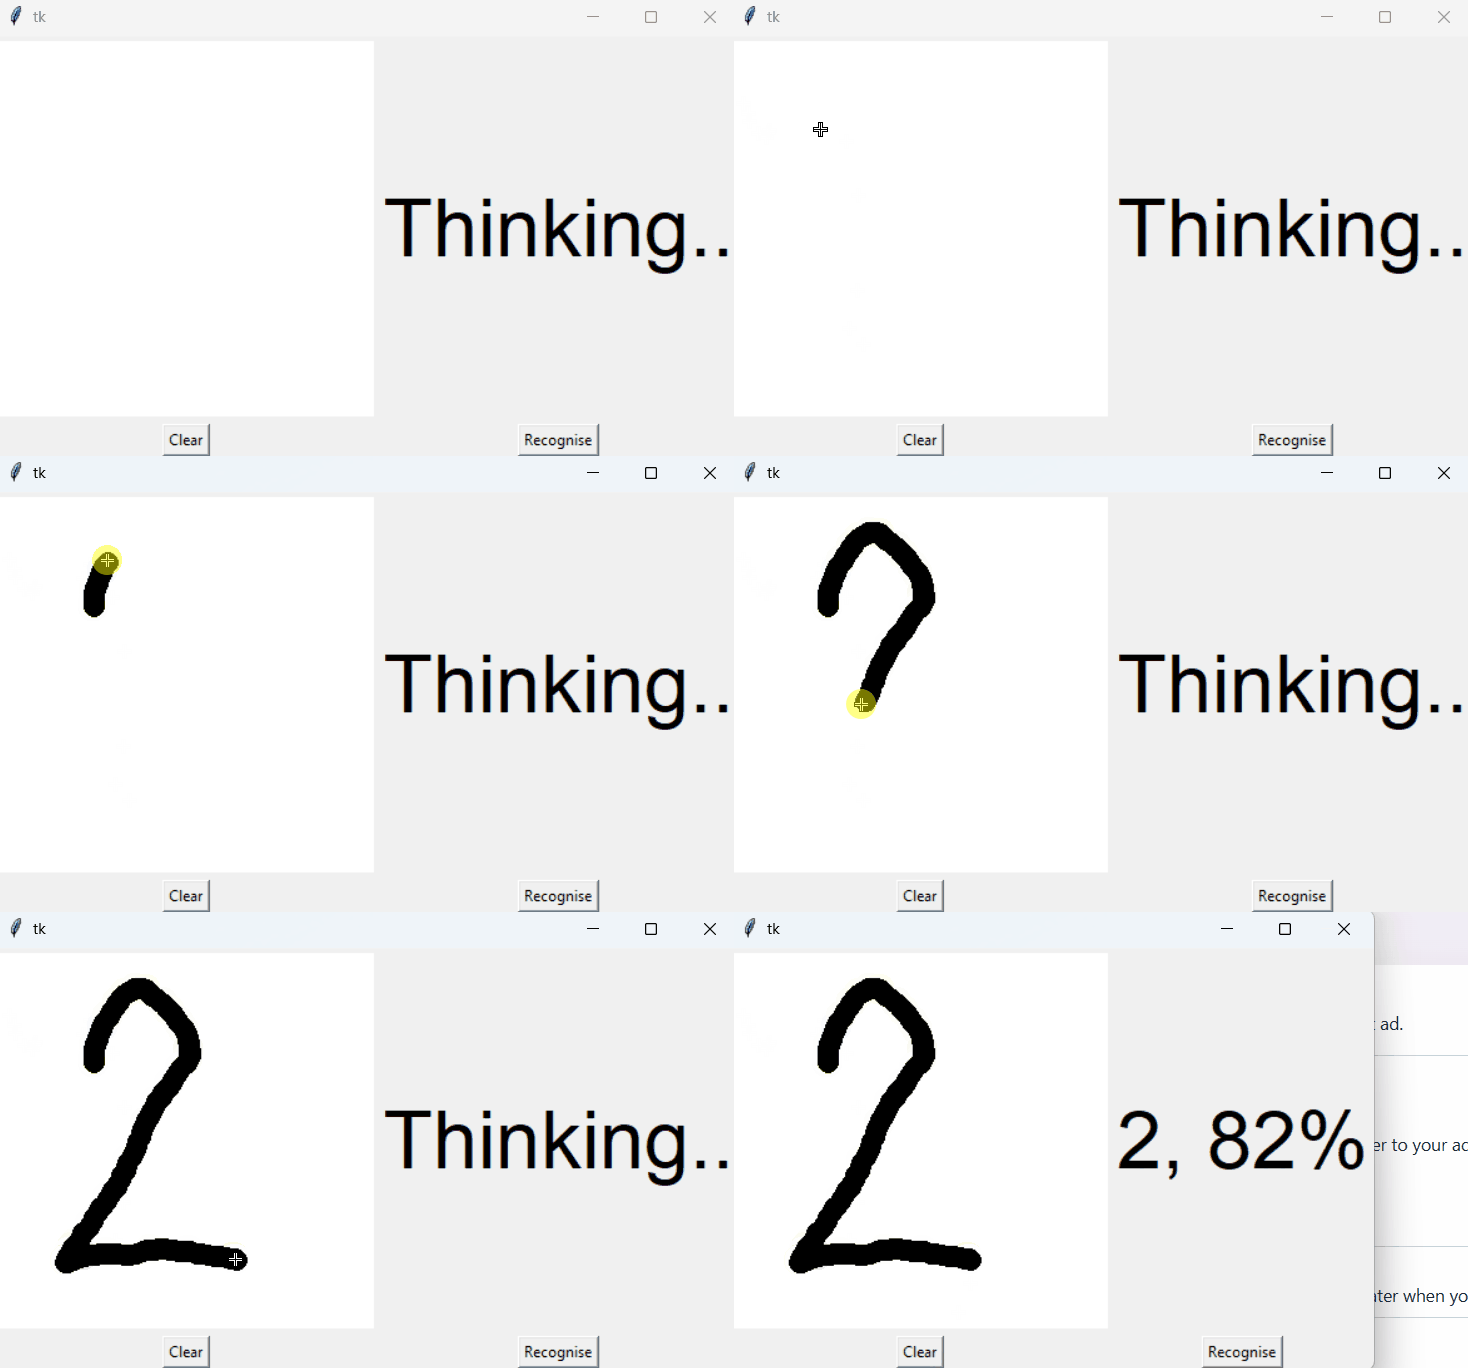
Completion requirements:
- Make a submission